Cadena
Nova Thief whipping chains and a swappable arsenal of summoned weapons in fast, hands-on combos.

Overview
Cadena is the Nova Thief: an ex-princess of Heliseum who reinvented herself in the Shadowdealers' black market after Magnus destroyed her home. She fights with a Chain (secondary: Warp Forge) and a rotating arsenal of summoned weapons — scimitars, claws, shotguns, daggers, even a brick — woven between chain strikes.
| Branch | Nova Thief |
| Primary stat | LUK |
| Secondary stat | DEX and STR |
| Weapon | Chain (+ Warp Forge secondary) |
| Playstyle | Close-range combo weaving; weapon swaps trigger bonus attacks |
| Difficulty | High APM — one of the most hands-on kits in the game |
Why play Cadena? Deep, expressive combo gameplay where skill genuinely shows — two Cadenas with identical gear can perform very differently. She's also one of the strongest classes in the game. She has Dark Sight on demand, shields that let you tank damage, and some of the best free movement in the game. Very fun and interactive.
Why not? Damage purely depends on your hands — she requires a lot of practice and instant decision-making, and she's genuinely difficult to play.
Introduction
Cadena's damage comes from eight stacks of  Muscle Memory. Each stack
can be built with a different Chain Arts skill, but using
Muscle Memory. Each stack
can be built with a different Chain Arts skill, but using  Chain Arts:
Thrash instantly stacks all eight. Muscle Memory gives us passive FD
along with its proc between each skill usage, and Muscle Memory spikes
proc whenever the Muscle Memory passive is refreshed.
Chain Arts:
Thrash instantly stacks all eight. Muscle Memory gives us passive FD
along with its proc between each skill usage, and Muscle Memory spikes
proc whenever the Muscle Memory passive is refreshed.
The goal of Cadena is to weave skills to proc as much Muscle Memory as
possible. Since Cadena has eight skills to weave, there are many combinations
possible. The basis of comboing on Cadena is to use Thrash before
every skill so that it cancels the skill and adds the Thrash
final-damage passive to each one — you cannot combo without using
Thrash.
Different skills move Cadena in different directions and heights. We use this to our advantage to place and move ourselves without needing to physically move with the arrow keys. By using combos to position ourselves strategically, we can keep extremely high uptime while dodging many boss attacks.
While Cadena has one of the highest damage outputs in the game, she's also probably the hardest class to play in the game. Mastering Cadena takes a very long time, and you'll have to commit to practicing combos and bossing. It's very rewarding, but at the same time very exhausting. You've been warned.
Setup
Inner Ability
| Bossing | Farming |
|---|---|
| 20% CD Skip (mandatory) | 20% Meso obtained |
| 8% DMG to Abnormal Status | 15% item drop rate |
| 10% Boss DMG | 8% DMG to normal monster |
Updated for: post-Angelic Buster rework & Inner preset.
Link Skills
Updated links with level 3 changes. Lumi would replace Kinesis likely if your IED isn't high enough — check values with Scouter. Swap in Kinesis over Lynn if you have enough crit rate to drop it. Swap in Adele over Kinesis in a party of 3+ if you aren't lazy. Swap in the defense links of Resistance/Warrior/Shade if needed. Scouter can give you an FD breakdown of each link.
Bossing:
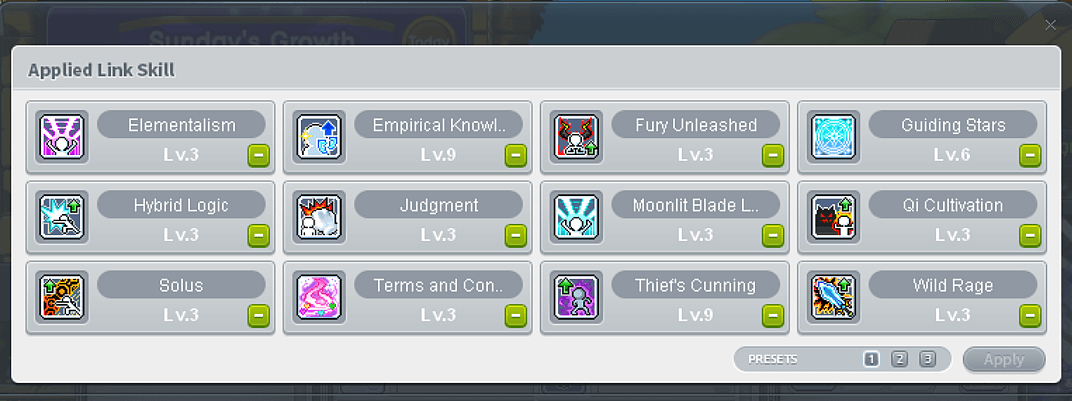
Mobbing:

Hyper Skills
 Chain-less Arts — Reinforce (20% dmg)
 Chain-less Arts — Boss Rush (20% boss dmg)
 Chain Arts: Thrash — Reinforce (20% dmg)
 Chain Arts: Thrash — Linked Attack Reinforce (5% FD)
 Chain Arts: Beatdown — Cooldown Cutter (−50% cd)
V-Matrix
Did you know you can turn off the greyscale from  ? Just
right-click the skill in your skill tab — it should help reduce lag and frame drops.
? Just
right-click the skill in your skill tab — it should help reduce lag and frame drops.
If you are farming you can level both  /
/  first.
Boost nodes: 


 —
the last two don't really matter, do them after all other nodes:
—
the last two don't really matter, do them after all other nodes:
 /
/ 
Job/common nodes: 


Decent priority: 


 —
max first, though it can also be slotted last since it's only
for bossing.
—
max first, though it can also be slotted last since it's only
for bossing.
Hexa Matrix
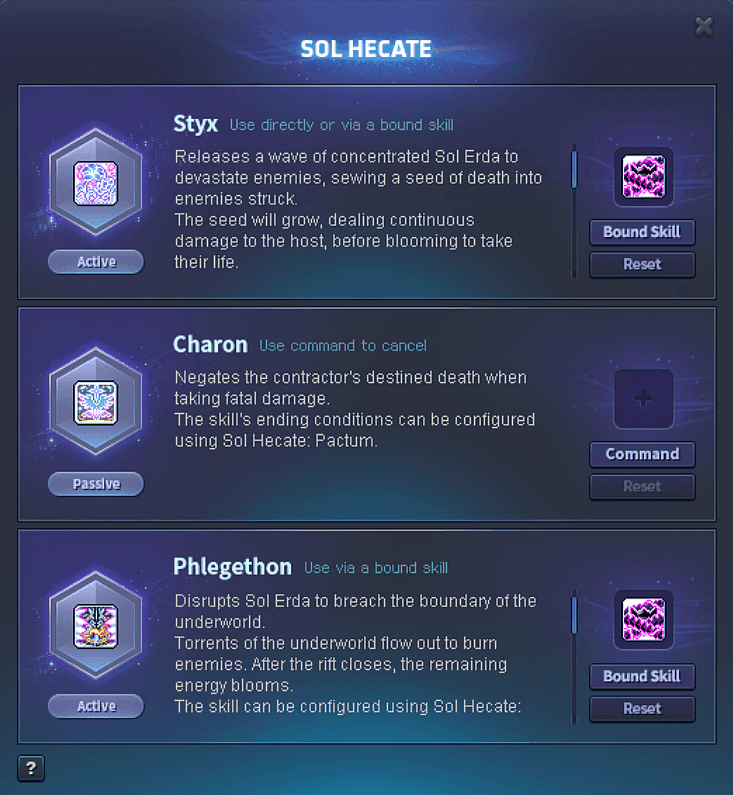
M3 =  , M4 =
  .
.

For  , link it to
  .
.
Hexa Stat
A generic guideline for people who just need some sort of idea — to min-max, use Scouter's analysis/optimization → boss setting optimization.
When to start upgrading:
- Around mastery lvl 5–9 for Hexa Stat 1
- Around mastery lvl 19 for Hexa Stat 2
- Around mastery lvl 25 for Hexa Stat 3
First stat core:
- Main stat: Attack. Sub stats: LUK + Boss dmg%
- Prioritize the highest values of Attack > LUK > Boss Dmg
- Scouter can help you optimize multiple cores
- Very late in the end game (Heroic) you eventually swap Boss Dmg for Crit Dmg
Legion Artifact
Most → least priority:
- Cooldown Skip
- Boss Damage
- Damage
- IED
- Crit Dmg
- All Stat
- Attack
- Buff Duration
Slot in Meso, Item Drop, and EXP Gained if you are farming.
Oz Rings
In general the best ring is Ring of Restraint (RoR), swapping to Weapon Jump
(WJ) for mini bursts. A perm  will also beat out a Continuous Ring (Cont) on
Heroic. General order:
will also beat out a Continuous Ring (Cont) on
Heroic. General order:
- 4 /
 4
4 - 4
 4
4- 3
- 3
Those are typically the only usable rings in most bossing situations compared to a 21/22-star 3-line ring. Niche picks:
- Risk Taker 4 — mainly a dojo ring, but in bosses that are easy to not get hit
in (aka Limbo) it beats 4 for mini burst.
- Total Control 4 — basically a dojo ring, but on Heroic it should beat a 3
for mini bursts; Reg/Interactive players late-game can see it beat 4 — check
with Scouter.
- Health cut/limit rings — used for Crisis HM setup; CHM4 can be useful in
Culvert if you don't have a (the Culvert rotation below has a method to proc
it).
- Dojo Crit Dmg 4 and Level Jump 4 have slight use cases — keep a copy.
As always, use Scouter to check your own values against your ring setup.
WSE
For Heroic, BIS is 9/0/0 and the BIS secondary is PNO.
- Weapon (Arcane & Genesis): 3L atk
- Emblem: 3L atk
- Secondary: 3L atk OR 21% atk + 30% boss
These setups are close to each other, boss dmg being more favorable during burst: 9/0/0, 8/1/0, 7/2/0.
Why 9/0/0 (napkin math)
Unverified math from the guide (take with a grain of salt), using a near-end-game Cadena's stats (base att 2613, base dmg 257.5%, BD 400%):
257.5% dmg base:  9% att → 26.13 × 1.96 × 7.575 = 387.95
                  40% bd  → 26.13 × 1.87 × 7.975 = 389.68
400% dmg base:    9% att → 26.13 × 1.96 × 9     = 460.93
                  40% bd  → 26.13 × 1.87 × 9.4   = 459.31
A 30% BD line returned a much lower multiplier (384.80) than 9% att. Simplified
from AD × (1 + Dmg% + BD%) = (FlatATT/100) × (1 + ATT%) × (1 + Dmg% + BD%).
Cheap Shot 
A very interesting skill that can sway Cadena's damage by a large amount: it provides 2% crit rate and 11% crit damage for every unique debuff on the boss. Cadena can get up to 6 stacks solo (7 during binds); in a party you can sit at 7 permanently as long as a party member has a debuff. 7 stacks (77% crit damage) is roughly 20% FD at end-game values; 6 stacks is about 17% FD.
Debuffs Cadena applies solo:
- Bleed (all attacks)
- Confusion
 Terrified (30% IED debuff)
- & Slow
- Venom Burst
 Mage Link (9% DMG / 9% IED)
 & — only while the
boss is bound (Origin bind overrides Beatdown bind, so this cannot be stacked)
& — only while the
boss is bound (Origin bind overrides Beatdown bind, so this cannot be stacked)
CD Hat
Best → worst:
- −8s
- −7s
- −6s
- −5s (anything past −4 is basically a Reg/Interactive thing)
- −4s + 9% stat
- −4s
- −3s + 9% stat
- −3s
- −2s + 18% stats
- −2s
- 30% stats
For −2s alone expect 7–10% FD depending on your skill level; every additional −1s is roughly 1.5–3.5% FD. On a non-moving target, −4s beats the other options and is nice QoL for training.
A CD hat doesn't change your ability to animation-cancel — your DPS upkeep and skill usage heavily affect how much you actually gain from it (though it can raise your skill counts in a fight). Note: having more skills available doesn't necessarily mean you can use more skills — that's highly rotation-dependent.
−2s + %stats should be the aim for most players unless Cadena is your main. Don't chase a −4 hat until Eternals as a Heroic player; Reg/Interactive players generally stop at −5.
Flames
Endgame flame values for Heroic (Reboot): ATK = 3, All stat % = 10–11 (dependent on all-stat lines), sub stat = 0.1.
Attack Speed
2AS vs 1AS vs 0AS: attack speed does not affect Cadena as much as other classes —
animation cancelling stays similar; what changes is the interval in which you can
cancel. Your ability to use skills off cooldown matters much more for overall
damage. Combo timers change with AS, so get used to playing at 0AS (green pot + ) as soon as possible. It also speeds up certain animations.
Generally: use whichever feels better to you — there has not been conclusive
evidence either way. A 3-minute stationary-dummy test (by ChickenCdena, −4 hat +
20% CD skip) found skill usage at 1AS and 0AS very similar: BAs averaged slightly
better with DSI (more and procs), but great BAs happened
without it too — it mostly just feels smoother with DSI.
Combos
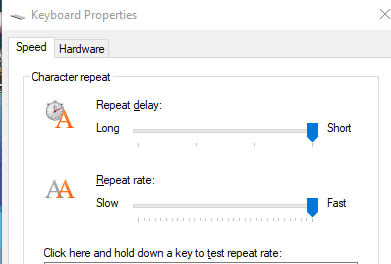
Quality-of-life first: for easier  combos, set your keyboard repeat
delay/rate to fast (Keyboard Properties), or set
combos, set your keyboard repeat
delay/rate to fast (Keyboard Properties), or set AutoRepeatDelay/AutoRepeatRate
in the registry under HKEY_CURRENT_USER\Control Panel\Accessibility\Keyboard Response. Recommended settings: 100–120 / 10–30. Enable filter keys in Windows
and also set the Flags value to 63.
Positioning
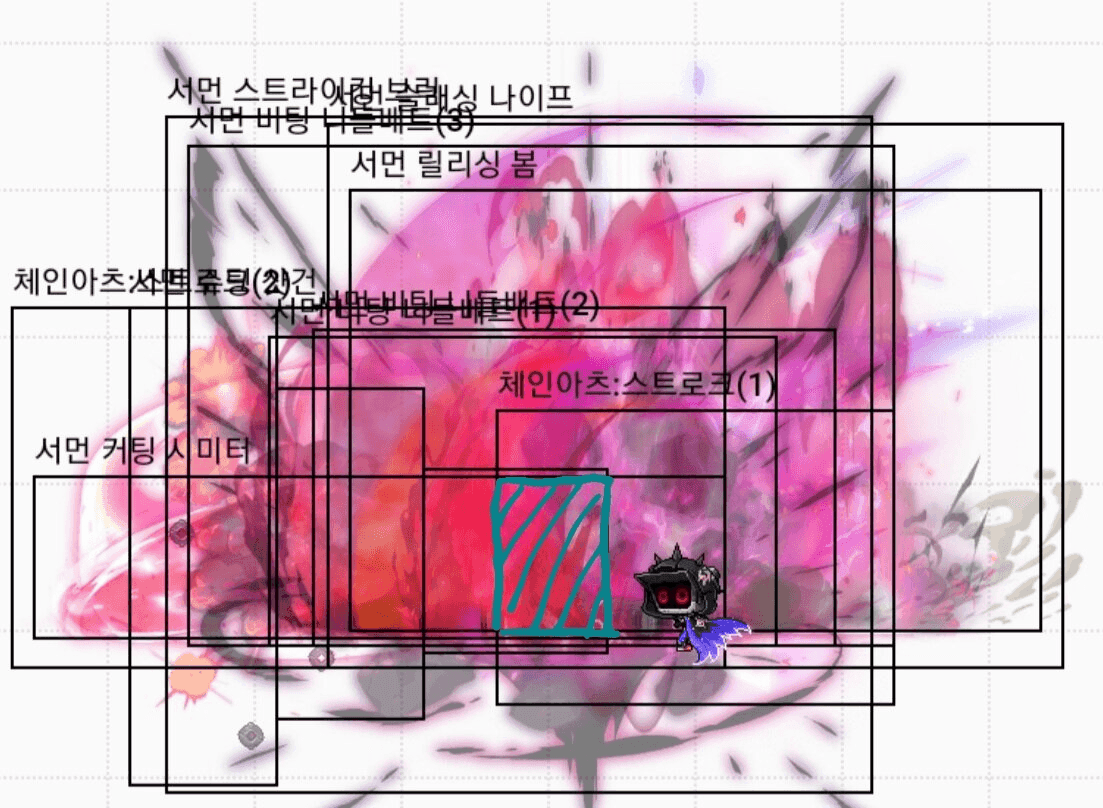
Hitboxes of all the skills — the optimal boss location is outlined in blue:
Combo Priority
General DPM priority outside of burst:
> combos while  is touching the boss >
> if it needs to be replaced >
combos without
is touching the boss >
> if it needs to be replaced >
combos without
Use before when possible: Shuriken's
pass-through procs three times rather than once with
— as long as (a) the boss is big enough and (b) you're placed a bit further
from the boss.
Practice Combos
Thrash-cancelling combos are 99% of the time rhythmic — it's not as fast as you think. Once the rhythm clicks you'll pull off combos freely.
Practice in order — hover any icon for the skill name (⬆ = holding up arrow).
Starters:
Main combos:
Never really practical, mainly a practice thing:
Notes on Combos and Skill Usage
- Treat your combos (e.g.

 ) as one skill to
memorize options — but don't lock skills into only ever appearing in one chain.
) as one skill to
memorize options — but don't lock skills into only ever appearing in one chain.  in the air acts as a teleport (e.g. to dodge Lotus laser):
or both put you mid-air
and make Scimitar act as a TP.
in the air acts as a teleport (e.g. to dodge Lotus laser):
or both put you mid-air
and make Scimitar act as a TP. stores the Thrash FD buff, so you can use it to increase
 damage ().
- Pursuit cancels both animation and damage of — instead do
to stop the brick animation safely.
- Using before mid-combo is difficult and doesn't yield much — optional,
not recommended.
- If you CD-skip a skill (e.g.
 ), combo with something else while
everything's on CD, or to tap it ASAP so it's back
in time for the next combo.
), combo with something else while
everything's on CD, or to tap it ASAP so it's back
in time for the next combo. - We can now use and in the air. Always try to
jump-cast then so you
can fit two full within one .
- If during DPM your resets but your doesn't, a good
combo is so you proc one more with
the during your .
- Try to save for repositioning during boss fights rather than using
it in combos all the time — it doesn't do as much damage, but it's great for
dodging things fast.
Final Thoughts
There are many combinations and permutations of combos you can use and come up with. Some are more optimal than others due to CD timings, some use up skills faster than others so you have more time to put in thrashes during skill downtime for more dpm.
Be creative, try out combos that aren’t standard.
The goal is to combo without being moved from your original position. However this isn’t always the most optimal for bossing and you want to adjust timings for replacing yourself to dodge boss attacks. The goal is to combo and be in control of where you want to end up being.
Try not to only use certain skills for specific combo chains; this is a very bad habit to get into.
Practice, practice, practice!!!
Combo Videos
- Cadena Combo Guide (Thrash/Pursuit Cancelling Basics) — Ant
- Cadena 101 Guide Part 1 — Procida GMS
- Thrash Cancel Timing Drills (with audio cues) — Story GMS
- Full rotations 8AS: BA −5, 8AS full rotation, challenge dummy clip
- Full rotations 10AS: 10AS full rotation
Bossing
Skill Sequence
Set up two skill sequences (full burst / mini burst) — this assumes ring-swapping
for mini burst; if not, add  at the start of the mini burst sequence.
We put towards the beginning so that it doesn't kill immediately, resulting in potential extension.
4 sequence:
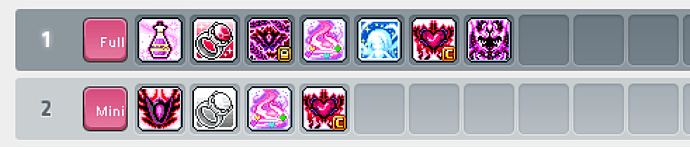
With a 5, put it at the beginning:

Burst Rotation
-
Charge
(using ) in entry room. -
Usually wait 15-17 seconds before going in for fatal.
-
(Debuff the boss with )
-
(set to not bind) → Full burst buff sequence.
-
Recommended:
—
generally better for anyone with a 4. After the Origin cutscene, spam
+ again; after the
bind runs out, .Alternative (bind-first) order — basically requires a
5: spam;
repeat if both CD-skip and Shuriken needs recasting (only if it's no longer
touching the boss); if only skips, keep spamming it until Grandis
skips are used up → after the 10s bind ends.
Have ~7s left on before you so it lasts through the whole
cutscene.
Culvert Rotation
Culvert rotation (−4 hat / swap to ): → ring swap still seems
best for Heroic/Reboot unless you have a 6. Replace every 15s
throughout the run. Edited as more testing is done — see the
video reference.
| When | What |
|---|---|
| Right-click to stage 1 (or just press down + Last Resort), and right-click so it does not bind | |
| Buff up; charge the Ark link with | |
Pop  | |
| 40s on Elixir | Pop |
| 32s on Elixir | Pop Fatal |
| 25s on Elixir | Pop your Culvert sequence (, stage 1, ), then , and right-click Last Resort to lock it once again |
| 18s on Veteran | Enter |
| Countdown 2 | Place & ; replace Maelstrom till the boss spawns, then till stage 4 |
| Stage 4 | stage 2 &  (Angelic Buster link) (Angelic Buster link) |
| Stage 5 | with |
| 86s | First  |
| 76s | & again — can be used sometime here |
| 60s | #2 with (hold Beatdown until Hecate's Styx is off cd); use as soon as it's off cd |
| 52s | & |
| 49s | Second |
| 35s | |
| 31s | Ring swap to ; use the last |
| 22s | Replace ; move to the left of the boss facing right; press your full burst sequence |
| 20s | ; use as soon as it comes off cd |
| 10s | |
| 5s | with |
Aggro the boss to the corner and stand on its left side when you pop
— more procs, thus more Veteran procs.
Bossing Tips
- is a 2-second iframe on a 45s CD (reducible by CD
hat) — you get the iframe on press; no need to hold the skill.
- Refresh every 15s.
- Optimize the time is touching the boss: if it can bounce off
a wall and return to hit the boss, leave it; if not, explode it as it leaves the
hitbox.
- will often deal the most damage over time to a stationary
boss — pop it off cooldown and reposition it as needed.
Pursuit as a Mobility and Positioning Tool
cancels animations — not to chain attacks, but to kill
momentum and end-lag:
- In the air, Pursuit stops your movement — position mid flash jump, or cancel
Verus Hilla's push and skill momentum ( / / ).
- On latch it gives ~1 second of Dark Sight; pulling yourself gives 2 seconds. Works on boss, platform, even the ground.
- Learn ↑Pursuit — up-Pursuit doesn't hook on bosses, but beware bosses with platforms (Slime, Gloom, Black Mage, Kalos).
- Learn to ↑Pursuit-cancel every weapon skill except (it cancels
Brick's damage): it cancels movement on lone weapon skills (when only ,
, or is off cd) and instantly ends a combo when you need to dodge
or reposition. Otherwise keep freely combo/Thrash-cancelling.
- Gloom example: or to
avoid using and sliding down the leg during burst.
- If you frame-drop during , build the habit of
in case Decoy Bomb sends you flying.
- Pursuit resets your flash/up jump (up jump → Pursuit → pull → up jump again
for longer air time), and resets Pursuit (up jump → Pursuit →
up jump → Shotgun → Pursuit → pull → up jump). Niche:
perpetual floating — generally worse than just
stalling with or a weapon skill.
General Tips
- Prioritize & during
for as many resets as possible. Even if only skips, spam it
until the Grandis skips are used up — bat is too valuable even without
procs. Then combo as normal.
- Learn the distances your skills move you — it matters in harder bosses.
- Keybind instead of using the attack key: you can pop and
recast Shuriken with Thrash bound in a single press, and while ducking, Thrash
stands you up instead of crouch-attacking.
- Also bind
 (your flash jump) for faster repositioning around the
boss — positioning is everything on Cadena, mostly because of Shuriken usage.
(your flash jump) for faster repositioning around the
boss — positioning is everything on Cadena, mostly because of Shuriken usage. - The Mu Lung practice dummy is your friend. You won't get it within a week — it takes hours — but the class is worth it once you do.
Mobbing
Farming setup lives inline in Setup: the farming Inner preset, the mobbing link setup, the farm-first V-Matrix leveling note, and the Legion Artifact farming slots.
Training Maps
A great rotation-building resource for all classes: maplemaps.net. Each map below has a linked build video in the original doc (mostly Korean uploads — the keyword table below helps you search for more).
Without Sol Janus:
| Level | Maps |
|---|---|
| 200–205 Vanishing Journey | Weathered Land of Rage and Sorrow · Forked Road 1 |
| 210–215 Chu Chu Island | Mottled Forest 2 · Slurpy Forest Depths · Torrent Zone 3 |
| 220–225 Lachelein | Occupied Dance Floor 1 · Victory Plate Street 1 |
| 225–230 Arcana | The Forest of Earth · Between Frost and Thunder 1 |
| 230–235 Morass | Abandoned Area 3 · That Day in Trueffet 3 |
| 235–240 Esfera | Living Spring 6 · Radiant Temple 3 |
| 240–250 Sellas | The Final Edge of Light 6 · The Final Edge of Light 2 |
| 245–255 Moonbridge | Last Horizon 6 · Mysterious Fog 3 · Mysterious Fog 5 |
| 250–255 Labyrinth of Suffering | Core 6 · Core 4 · Core 1 |
| 255–260 Limina | End of the World 2-8 · End of the World 2-5 |
| 260+ Cernium | Royal Library Section 2 · Royal Library Section 6 |
With Sol Janus:
| Level | Maps |
|---|---|
| 260+ Cernium | Rocky Overlook 1 · Library 1/4 · Royal Library Section 6 |
| 260+ Burning Cernium | Eastern City Ramparts 1 · Library 1, 2, 4, 5 |
| 265+ Hotel Arcus | Outlaw Infested Waste 2/4 · Train with No Destination 3/4 |
| 270+ Odium | Road to the Castle's Gate 4 · Captured Alley 3 · Laboratory Behind Locked Door 2 (lazy) · Laboratory Behind Locked Door 4 · Sunny Laboratory 3 |
| 275+ Shangri-La | Harsh Winter 2 (1-shot dusk) · Blooming Spring 2 · Drowsy Autumn 5 · Harsh Winter 4 |
| 280+ Arteria | Combat Zone Outskirts 2 · Western Outskirts · Bottom Deck Passage 5 · Bottom Deck Passage 6 |
| 285+ Carcion | Giant Coral Colony 3 · Calm Beach 3 · Among Tainted Trees 1/3 · Breathtaking Cave 4 · Sunken Ruin 4 |
| 290+ Tallahart | Fate-Fields of Providence 2 (stand left, rotate one wave, the next) · Fate-Fields of Providence 3 · Night Road 1 · Night Road 3 |
Korean search keywords (for finding build videos):
| Korean | English | Korean | English |
|---|---|---|---|
| 카데나 | Cadena | 문브릿지 | Moonbridge |
| 카르시온 | Carcion | 셀라스 | Sellas |
| 아르테리아 | Arteria | 에스페라 | Esfera |
| 도원경 | Shangri-La | 모라스 | Morass |
| 오디움 | Odium | 아르카나 | Arcana |
| 호텔 아르크스 | Hotel Arcus | 레헬른 | Lachelein |
| 불타는 | Burning (Cernium) | 츄츄 아일랜드 | Chu Chu Island |
| 세르니움 | Cernium | 소멸의 여로 | Vanishing Journey |
| 리멘 | Limina | 야누스 | (Sol) Janus |
| 고통의 미궁 / 미궁 | Labyrinth | 얌얌 | Yum Yum |
Links & Resources
- Cadena Discord — where this guide is maintained and discussed
- Original Cadena 101 doc — source of record for this page, including the per-map training videos not ported here
- Cadena on MapleWiki — story, job info
- Cadena skill list on MapleWiki — full skill data and tooltips
- maplemaps.net — rotation-building resource
- Scouter — referenced throughout for personal FD optimization